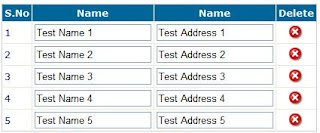
In ASP.NET, in order to add a TextBox to the GridView you will need to add a Template Column. In most of the cases I suggest that you use the Template Column instead of the Bound Column.
The reason is that by using the Template Column you can refer to the column by finding the control which exists inside the column. Bound Column works by using indexes which means that if later you add another column and change the columns placement then you will need to change all the columns respectively.

Take a look at the code below which adds Template Columns to the GridView.
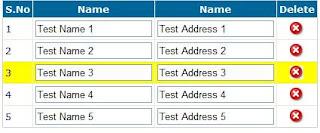
We need to highlight the row when the focus is on the TextBox. For this we can attach a simple client side event to the TextBox which is called "onFocus". The onFocus event is fired whenever a focus is made on the control. Take a look at the code below which demonstrate how to add the onFocus event to the TextBox control.
Include the javascript function on the page :
Include the style into the page
Finally, add the code behind code (sample given here is based on C#)
Now, run the application and focus on one of the TextBoxes and the appropriate row will be highlighted. The result should be like below :

If you have any doubts on this, add your comments.
The reason is that by using the Template Column you can refer to the column by finding the control which exists inside the column. Bound Column works by using indexes which means that if later you add another column and change the columns placement then you will need to change all the columns respectively.

Take a look at the code below which adds Template Columns to the GridView.
We need to highlight the row when the focus is on the TextBox. For this we can attach a simple client side event to the TextBox which is called "onFocus". The onFocus event is fired whenever a focus is made on the control. Take a look at the code below which demonstrate how to add the onFocus event to the TextBox control.
 <asp:GridView ID="GridView1" runat="server" AutoGenerateColumns="False" BackColor="White"
            BorderColor="#CCCCCC" BorderStyle="Solid" BorderWidth="1px" CellPadding="3" Font-Names="Verdana"
            Font-Size="Small" Width="300px">
            <FooterStyle BackColor="White" ForeColor="#000066" />
            <RowStyle ForeColor="#000066" />
            <Columns>
                <asp:ButtonField CommandName="Select" Visible="false" />
                <asp:BoundField DataField="RowNumber" HeaderText="S.No" InsertVisible="False" ReadOnly="True"
                    Visible="true" SortExpression="RowNumber" />
                <asp:TemplateField HeaderText="Name">
                    <ItemTemplate>
                        <asp:TextBox ID="TextBox1" onBlur="ResetColor()" onFocus="ChangeColor()" TabIndex="1"
                            Text='<%#Eval("FirstName")%>' runat="server"></asp:TextBox>
                    </ItemTemplate>
                </asp:TemplateField>
                <asp:TemplateField HeaderText="Name">
                    <ItemTemplate>
                        <asp:TextBox ID="TextBox1" onBlur="ResetColor()" onFocus="ChangeColor()" TabIndex="1"
                            Text='<%#Eval("Address")%>' runat="server"></asp:TextBox>
                    </ItemTemplate>
                </asp:TemplateField>
                <asp:TemplateField HeaderText="Delete">
                    <HeaderStyle HorizontalAlign="Center" Width="6%" VerticalAlign="Middle" />
                    <ItemStyle HorizontalAlign="Center" Width="6%" VerticalAlign="Middle" />
                    <ItemTemplate>
                        <asp:ImageButton ID="btnDelete" OnClientClick="return confirm('Do you want to delete this record?');"
                            CommandName="DeleteRow" AlternateText="Delete" runat="server" CommandArgument='<%# Eval("RowNumber") %>'
                            ImageUrl="icon_delete_grid.gif"></asp:ImageButton>
                    </ItemTemplate>
                </asp:TemplateField>
            </Columns>
            <PagerStyle BackColor="White" ForeColor="#000066" HorizontalAlign="Left" />
            <SelectedRowStyle BackColor="Yellow" Font-Bold="True" ForeColor="White" />
            <HeaderStyle BackColor="#006699" Font-Bold="True" ForeColor="White" />
        </asp:GridView>
Include the javascript function on the page :
<script type="text/javascript">
     var oldRowColor;
    function ResetColor()
    {
        var obj = window.event.srcElement;
        if(obj.tagName == "INPUT" && obj.type == "text")
        {
            obj = obj.parentElement.parentElement;
            obj.className = oldRowColor;
        }
    }

    // this function is used to change the backgound color
    function ChangeColor()
    {
        var obj = window.event.srcElement;
        if(obj.tagName == "INPUT" && obj.type == "text")
        {
        obj = obj.parentElement.parentElement;
        oldRowColor = obj.className;
        obj.className = "HighLightRowColor";
        }
    }
    </script>
Include the style into the page
<style type="text/css">
        .RowStyleBackGroundColor
        {
            background-color: #FFFBD6;
        }
        .RowAlternateStyleBackGroundColor
        {
            background-color: White;
        }
        .HighLightRowColor
        {
            background-color: Yellow;
        }
    </style>
Finally, add the code behind code (sample given here is based on C#)
protected void Page_Load(object sender, EventArgs e)
        {
            DummyData();
        }

        private void DummyData()
        {
            DataTable dtCurrentTable = (DataTable)ViewState["CurrentTable"];
            DataRow drCurrentRow = null;

            //Store the current data to ViewState
            DataTable dt = new DataTable();
            DataRow dr = null;
            dt.Columns.Add(new DataColumn("RowNumber", typeof(string)));
            dt.Columns.Add(new DataColumn("FirstName", typeof(string)));
            dt.Columns.Add(new DataColumn("Address", typeof(string)));
            for (int i = 1; i <= 5; i++)
            {
                dr = dt.NewRow();
                dr["RowNumber"] = i;
                dr["FirstName"] = "Test Name " + i;
                dr["Address"] = "Test Address " + i;

                dt.Rows.Add(dr);
            }
            ViewState["CurrentTable"] = dt;

            //Rebind the Grid with the current data
            GridView1.DataSource = dt;
            GridView1.DataBind();
        }
Now, run the application and focus on one of the TextBoxes and the appropriate row will be highlighted. The result should be like below :

If you have any doubts on this, add your comments.


