Archive for 2009

New Year Wishes - Year 2010

New Year Wishes - Year 2010

To my ever tolerant my friends and relatives, available round the clock for valuable support and guidance, and to all those who are very close to my heart, here is a special note, exactly a day before yet another sunrise in our life that'd see us replace one more calendar with a brand new one, quite symbolic to our mind's act of replacing unfullfilled dreams and promises with new ones and to give it all a fresh beginning.

GOOD BYE my 2009.

Here's wishing all a very happy, peaceful and prosperous New Year 2010.

New Year Wishes - Year 2010

New Year Wishes - Year 2010

To my ever tolerant my friends and relatives, available round the clock for valuable support and guidance, and to all those who are very close to my heart, here is a special note, exactly a day before yet another sunrise in our life that'd see us replace one more calendar with a brand new one, quite symbolic to our mind's act of replacing unfullfilled dreams and promises with new ones and to give it all a fresh beginning.

GOOD BYE my 2009.

Here's wishing all a very happy, peaceful and prosperous New Year 2010.

What is an ASHX file Handler or web handler ?

In ASP.NET, you probably spend most of your time creating .aspx files with .cs files as code behind or use .ascx files for your controls and .asmx files for web services.

A web handler file works just like an aspx file except you are one step back away from the messy browser level where HTML and C# mix. One reason you would write an .ashx file instead of an .aspx file is that your output is not going to a browser but to an xml-consuming client of some kind.

Working with .ashx keeps you away from all the browser technology you don't need in this case. Notice that you have to include the IsReusable property.

What does the code there do?

It defines two parts of the IHttpHandler interface. The important part is ProcessRequest(), which will be invoked whenever the Handler.ashx file is requested or pointed to.

<%@ WebHandler Language="C#" Class="Handler" %>

using System;
using System.Web;

public class Handler : IHttpHandler
{
public void ProcessRequest(HttpContext context)
{
context.Response.ContentType = "text/plain";
context.Response.Write("Hello World");
}

public bool IsReusable
{
get
{
return false;
}
}
}

Using query strings:

Developers commonly need to use the QueryString collection on the Request. You can use the Request.QueryString in the Handler just like you would on any ASPX web form page.

<%@ WebHandler Language="C#" Class="QueryStringHandler" %>

using System;
using System.Web;

public class QueryStringHandler : IHttpHandler
{
public void ProcessRequest (HttpContext context)
{
HttpResponse r = context.Response;
r.ContentType = "image/png";
string file = context.Request.QueryString["file"];
if (file == "Arrow")
{
r.WriteFile("Arrow.gif");
}
else
{
r.WriteFile("Image.gif");
}
}

public bool IsReusable
{
get
{
return false;
}
}
}

Now Debug the application:

When you pass Fille='Arrow' in query string like as follows

http://localhost:1372/FileHandler/QueryStringHandler.ashx?file=Arrow
You will get the output with arrow image. Otherwise you will get output as image.

http://localhost:1372/FileHandler/QueryStringHandler.ashx?file=Image

The above code receives requests and then returns a different file based on the QueryString collection value. It will return one of two images from the two query strings.

When we use Handler:

Here I want to propose some guidelines about when to use custom handlers and when to use ASPX web form pages. Handlers are better for binary data, and web forms are best for rapid development.

Use web forms (ASPX) when you have:

  • Simple HTML pages

  • ASP.NET custom controls

  • Simple dynamic pages

Use handlers (ASHX) when you have:

  • Binary files

  • Dynamic image views

  • Performance-critical web pages

  • XML files

  • Minimal web pages

Hope this will be useful.

Thanks : Purushottam

How to add jQuery intellisense in Visual Studio 2008

How to add jQuery intellisense in Visual Studio 2008. I will discuss the below items :

  • How to add jQuery intellisense in .aspx page.

  • How to add jQuery intellisense in external javascript file.


Step 1 : Install Visual Studio 2008 Service Pack 1

To see whether you have already installed version of Visual Studio 2008 Service Pack 1.
1. Open Visual Studio 2008. Go to Help--->About Microsoft Visual Studio.

2. About Microsoft Visual Studio window will open.
You may here Version 9.0.30729.1 SP or later version.
If Visual Studio service pack is not installed then your first step is to install it.

Step 2 : Download and install VS2008 SP1 Hotfix to Support "-vsdoc.js" IntelliSense Doc Files

You can get information regarding hot fix in detail on below links
http://blogs.msdn.com/...doc-files-is-now-available.aspx

http://code.msdn.microsoft.com/.../ProjectReleases.aspx?ReleaseId=1736

Step3 : Download the jQuery-vsdoc.js file

Go to http://docs.jquery.com/...#Download_jQuery

You will find different releases of jQuery. The latest release is jQuery 1.3.2.

Click Visual Studio link in front of Documentation tag. You will be redirected to next page. In next page you can found the link for downloading jQuery-vsdoc.js file

Step 4: Rename the downloaded file

After downloading that rename it as follows.

1. Rename jquery-1.3.2-vsdoc2.js into jquery-1.3.2.min-vsdoc.js

2. Rename jquery-1.3.2.js into jquery-1.3.2.min.js


How to add jQuery intellisense in .aspx page.

In the .aspx page, add the reference jquery-1.3.2.min.js file into .aspx page. Here I have my script file under scirpts folder.

 <script src="scirpts/jquery-1.3.2.min.js" type="text/javascript"> </script> 

Now press CTRL+ SHIFT+J to update the Jscript intellisense or Go to Edit ---> IntelliSense ---> Update Jscript Intellisense. You will see Update JScript Intellisense message in the status bar.

That's all. Now you can test that your jQuery intellisense has started working.


How to add jQuery Intellisense in External javascript file

1. Add the reference of jQuery file at the top of My.js file
/// <reference path = "jquery-1.3.2.min.js" /> 

2. Now press CTRL+ SHIFT+J to update the Jscript intellisense or Go to
Edit ---> IntelliSense ---> Update Jscript Intellisense.

That's all. Make your light weight web application by using jQuery.

Hope this will be helpfull.

Free eBook - jQuery Cookbook Dec 2009

Free download jQuery Cook book Dec 2009 edition.

Use of jQuery :
  • Create better, cross-platform JavaScript code

  • Learn detailed solutions to specific client-side problems

  • For web designers who want to create interactive elements for their designs

  • For developers who want to create the best user interface for their web applications and so on...


Downloads :
Megaupload

Rapidshare

Hotfile

Mediafire

Password :
www.updatebooks.com

A 'Thank You' would be nice! I hope this will be useful.
Thanks : Katz

Download : SQLite Expert Professional

SQLite Expert Professional v2.3.17.1934 Portable

SQLite Expert is a powerful visual tool that enables you to easily administer your SQLite3 databases and gain significantly better visibility into how your databases are operating. SQLite Expert integrates database management and maintenance into a single, seamless environment, with a clear and intuitive graphical user interface.


Features and Benefits

  • Edit tables and views visually, without writing a line of SQL. Easily restructure fields, indexes, constraints, triggers without losing data already existing in the tables.

  • Build SQL scripts and generate views visually using the integrated Query Builder.

  • Create SQLite3 databases, view and change database parameters, check database integrity and vacuum (compact) databases.

  • Easily transfer data between SQLite databases, import data from SQL scripts or ADO data sources, or export to SQL scripts.

  • Display and edit data in the grid, including BLOB and image fields. Currently supports BMP, JPG and PNG image formats. BLOB fields can be edited with the integrated hex editor.

  • Execute SQL queries and display results in the grid or as text.

Requirements:

Windows 2000/XP/2003/Vista

Download Links:

Hotfile

Uploading

Rapidshare

Use the technology. A 'Thanks' would be appriciated.

How to highlight the GridView rows when the mouse moves over it

In ASP.NET, in order to add a TextBox to the GridView you will need to add a Template Column. In most of the cases I suggest that you use the Template Column instead of the Bound Column.

The reason is that by using the Template Column you can refer to the column by finding the control which exists inside the column. Bound Column works by using indexes which means that if later you add another column and change the columns placement then you will need to change all the columns respectively.


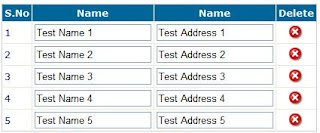
Take a look at the code below which adds Template Columns to the GridView.

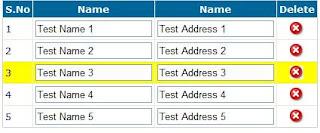
We need to highlight the row when the focus is on the TextBox. For this we can attach a simple client side event to the TextBox which is called "onFocus". The onFocus event is fired whenever a focus is made on the control. Take a look at the code below which demonstrate how to add the onFocus event to the TextBox control.


<asp:GridView ID="GridView1" runat="server" AutoGenerateColumns="False" BackColor="White"
BorderColor="#CCCCCC" BorderStyle="Solid" BorderWidth="1px" CellPadding="3" Font-Names="Verdana"
Font-Size="Small" Width="300px">
<FooterStyle BackColor="White" ForeColor="#000066" />
<RowStyle ForeColor="#000066" />
<Columns>
<asp:ButtonField CommandName="Select" Visible="false" />
<asp:BoundField DataField="RowNumber" HeaderText="S.No" InsertVisible="False" ReadOnly="True"
Visible="true" SortExpression="RowNumber" />
<asp:TemplateField HeaderText="Name">
<ItemTemplate>
<asp:TextBox ID="TextBox1" onBlur="ResetColor()" onFocus="ChangeColor()" TabIndex="1"
Text='<%#Eval("FirstName")%>' runat="server"></asp:TextBox>
</ItemTemplate>
</asp:TemplateField>
<asp:TemplateField HeaderText="Name">
<ItemTemplate>
<asp:TextBox ID="TextBox1" onBlur="ResetColor()" onFocus="ChangeColor()" TabIndex="1"
Text='<%#Eval("Address")%>' runat="server"></asp:TextBox>
</ItemTemplate>
</asp:TemplateField>
<asp:TemplateField HeaderText="Delete">
<HeaderStyle HorizontalAlign="Center" Width="6%" VerticalAlign="Middle" />
<ItemStyle HorizontalAlign="Center" Width="6%" VerticalAlign="Middle" />
<ItemTemplate>
<asp:ImageButton ID="btnDelete" OnClientClick="return confirm('Do you want to delete this record?');"
CommandName="DeleteRow" AlternateText="Delete" runat="server" CommandArgument='<%# Eval("RowNumber") %>'
ImageUrl="icon_delete_grid.gif"></asp:ImageButton>
</ItemTemplate>
</asp:TemplateField>
</Columns>
<PagerStyle BackColor="White" ForeColor="#000066" HorizontalAlign="Left" />
<SelectedRowStyle BackColor="Yellow" Font-Bold="True" ForeColor="White" />
<HeaderStyle BackColor="#006699" Font-Bold="True" ForeColor="White" />
</asp:GridView>


Include the javascript function on the page :

<script type="text/javascript">
var oldRowColor;
function ResetColor()
{
var obj = window.event.srcElement;
if(obj.tagName == "INPUT" && obj.type == "text")
{
obj = obj.parentElement.parentElement;
obj.className = oldRowColor;
}
}

// this function is used to change the backgound color
function ChangeColor()
{
var obj = window.event.srcElement;
if(obj.tagName == "INPUT" && obj.type == "text")
{
obj = obj.parentElement.parentElement;
oldRowColor = obj.className;
obj.className = "HighLightRowColor";
}
}
</script>

Include the style into the page

<style type="text/css">
.RowStyleBackGroundColor
{
background-color: #FFFBD6;
}
.RowAlternateStyleBackGroundColor
{
background-color: White;
}
.HighLightRowColor
{
background-color: Yellow;
}
</style>


Finally, add the code behind code (sample given here is based on C#)

protected void Page_Load(object sender, EventArgs e)
{
DummyData();
}

private void DummyData()
{
DataTable dtCurrentTable = (DataTable)ViewState["CurrentTable"];
DataRow drCurrentRow = null;

//Store the current data to ViewState
DataTable dt = new DataTable();
DataRow dr = null;
dt.Columns.Add(new DataColumn("RowNumber", typeof(string)));
dt.Columns.Add(new DataColumn("FirstName", typeof(string)));
dt.Columns.Add(new DataColumn("Address", typeof(string)));
for (int i = 1; i <= 5; i++)
{
dr = dt.NewRow();
dr["RowNumber"] = i;
dr["FirstName"] = "Test Name " + i;
dr["Address"] = "Test Address " + i;

dt.Rows.Add(dr);
}
ViewState["CurrentTable"] = dt;

//Rebind the Grid with the current data
GridView1.DataSource = dt;
GridView1.DataBind();
}

Now, run the application and focus on one of the TextBoxes and the appropriate row will be highlighted. The result should be like below :


If you have any doubts on this, add your comments.

How to change the background color in the Textbox on focus ?


I searched the solution for the following situation. In asp.net web application, gridview contains textbox in each row. When there is focus on the textbox, the background colour of the textbox must be yellow with bold otherwise it must be black with white text.

See the sample code: we reach the solution by simply adding onfocus and onblur event to the text box.


...
...

<asp:TextBox ID="text1" runat="server"
onFocus="this.style.background ='yellow'"
onBlur="this.style.background='white'"/>

....
....

Happy coding!

How to catch TAB key press with JavaScript?

The example code is tested in IE, Firefox and Opare. Probably also works in Netscape as well as others like Safari.

<html>
<head>
<script type="text/javascript">
var obj;
var TAB = 9;
function catchTAB(evt,elem)
{
obj = elem;
var keyCode;
if ("which" in evt)
{// NN4 & FF &amp; Opera
keyCode=evt.which;
} else if ("keyCode" in evt)
{// Safari & IE4+
keyCode=evt.keyCode;
} else if ("keyCode" in window.event)
{// IE4+
keyCode=window.event.keyCode;
} else if ("which" in window.event)
{
keyCode=evt.which;
} else { alert("the browser don't support"); }

if (keyCode == TAB)
{
obj.value = obj.value + "\t";
alert("TAB was pressed");
setTimeout("obj.focus()",1);// the focus is set back to the text input
}
}
</script>
</head>
<body>
<input type="text" onkeydown="catchTAB(event,this);">
</body>
</html>

Hope this will help you. Happy coding!

How to show a client-side message box at the next page load in ASP.NET

Showing a client-side message box at the next page load by use the below technique.

' Show a client-side message box at the next page load
' Example:
' ShowMessageBox(Me, "Order successfully submitted!")

public void ShowMessageBox(System.Web.UI.Page webPage, string message)
{
// replace ' with \', otherwise the resulting javascript may raise errors
message = message.Replace("'", "\\'");

// create the script and add it to the page's response
string script = "";
if ((!webPage.IsStartupScriptRegistered("StartupAlert")))
{
webPage.RegisterStartupScript("StartupAlert", script);
}
}

Happy Coding!

How to assign a default value to a Password Control in ASP.NET

If you set the TextMode property of a TextBox Web control to "Password" any default value you assign to the TextBox won't show up.

To work around this problem, add the following code to your ASP page:

There are two ways to initialize a TextBox whose TextMode is "password" with a default password:

Method 1 :-
<asp:TextBox TextMode="Password" id="txtPwd" RunAt="server"/>

<script language="C#" runat="server">
void Page_Load (Object sender, EventArgs e)
{
txtPwd.Attributes.Add ("value", "MyPassword");
}
</script>

Method 2 :-
<asp:TextBox Value="MyPassword" TextMode="Password" id="txtPwd" RunAt="server"/>

Happy coding!

How to change the Title in a Web Form at runtime in ASP.NET ?

In ASP.NET, a web form's title is determined by the HTML View's Title attribute. However, there is no property in the default (or any other namespace) that helps you to change the title programmatically.

Here's a simple workaround to accomplish this:

  • 1. Modify the current <Title> tag so that it's accessible in the code, by adding the tag.

  • 2. Assign an ID to the <Title> tag. Your code should look like this:
    <title id="pgTitle">Default Title</title>

  • 3. Add it to the code:
    protected System.Web.UI.HtmlControls.HtmlGenericControl pgTitle;

  • 4. Change the title in the code, using its InnerText property.
    pgTitle.InnerText = "Changed Text"

Happy Coding!

C# codes that improve productivity - Part 2

My early post, I explained five c# shorthands code tips. Again, I have listed another 5 C# shorthands that you can use to make your code too short.

Read my previous post at C# codes that improve productivity - Part 1

6. Nullable objects

A variable needs to have a value, it cannot be null. Sometimes it would be handy it was possible to assign "null" (eg. undefined) to a variable.

.NET 2.0 introduced the Nullable generic that makes this possible. The following two lines produce exactly the same object:
Nullable x = null;
int? x = null;

By putting a ? following a variable definition the compiler will wrap a Nullable generic around the type.

7. Automatic Properties

C# 3.0 introduced automatic properties. A property typically consists of a private variable which is exposed to the outside world through getters and setters (get;set;).

The following is common example of this:
public class Person
{
private string _firstName;
public string FirstName
{
get { return _firstName; }
set { _firstName = value; }
}
}

From C# 3.0 on we can reduce the above code to:
public class Person
{
public string Firstname { get; set; }
}

The C# compiler will automatically generate a backing variable and the correct get and set properties. Why is this useful? After all you could have just made a string variable in the class public instead.

By defining it as a property allows you to add the actual validation logic to your class at a later stage. The in-memory signature of the class won’t change which means that any external libraries compiled against your code will not have to be recompiled.

8. Type inference

In typical C# you will always carefully spell out your definitions:
string MyString = "Hello World";

From the right side of the declaration it is obvious that only one type (string) will ever match this definition. So instead of us doing the work, why not let the compiler figure this out?
var MyString = "Hello World";

The above definition will also create a string variable named "MyString". It is important to note that C# is still strongly typed.There is no performance impact results from using type inference.

The compiler does all the work figuring out the data type at compile time. Of course this feature created two opposite camps, one that thinks var should be liberally applied, and another one that abhors the whole idea. The middle ground seems to be that var should be used there were its use is obvious.
var SeniorStaff = Employees.Where(s => s.Age > 35);
foreach(var Member in SeniorStaff)
Console.WriteLine("Name: {0} Age: {1}",Member.Name,Member.Age);

For example what type would SeniorStaff be ?
((System.Linq.Enumerable.Iterator<<>f__AnonymousType0>)(SeniorStaff))

9. Lambda Expressions

C# 2.0 introduced anonymous methods, which are methods defined inside a method. Incredibly powerful and a nice way to put all kinds of evaluation logic inside your code they had the drawback that they could be quite hard to read.
Func mySeniorStaffFilter = delegate(int a) { return a > 35; }; 

The above method takes an integer as a parameter, and returns a boolean. It checks if the staff member passed to it is older than 35. If so, it returns true.

Lamba expressions make things a little easier to read, while being functionally exactly the same:
Func mySeniorStaffFilter = a => a > 35; 

Even better, you can define them anywhere a delegate would have fitted:
var SeniorStaff = Employees.Where(s => s.Age > 35); 

10. string.IsNullOrEmpty

Not really a language feature, but a useful little library function in its own right. How often do you need to test if a string is empty? Or null? The string.IsNullOrEmpty method returns true if this is the case.
if (String.IsNullOrEmpty(s) == true)
return "is null or empty";
else
return String.Format("(\"{0}\") is not null or empty", s);

Thanks : dijksterhuis

Hope this will help you. A 'Thank You' would be nice!